
Cheese Straws Recipe: 5 Ingredients for Crispy Party Bites
Why Do Some Cheese Straws Snap While Others Go Soft?
Why do some homemade cheese straws shatter with a satisfying crunch while others bend and turn greasy? The answer usually comes down to a few small choices: how you grate the cheese, how cold the dough is, and how long the straws bake. This cheese straws recipe uses just five pantry-friendly ingredients and walks you through each of those choices, so you end up with crisp, golden, sharply cheesy party bites. Whether you are planning a holiday spread, a game-day snack table, or a simple afternoon treat with tea, these easy cheese straws are a reliable place to start.
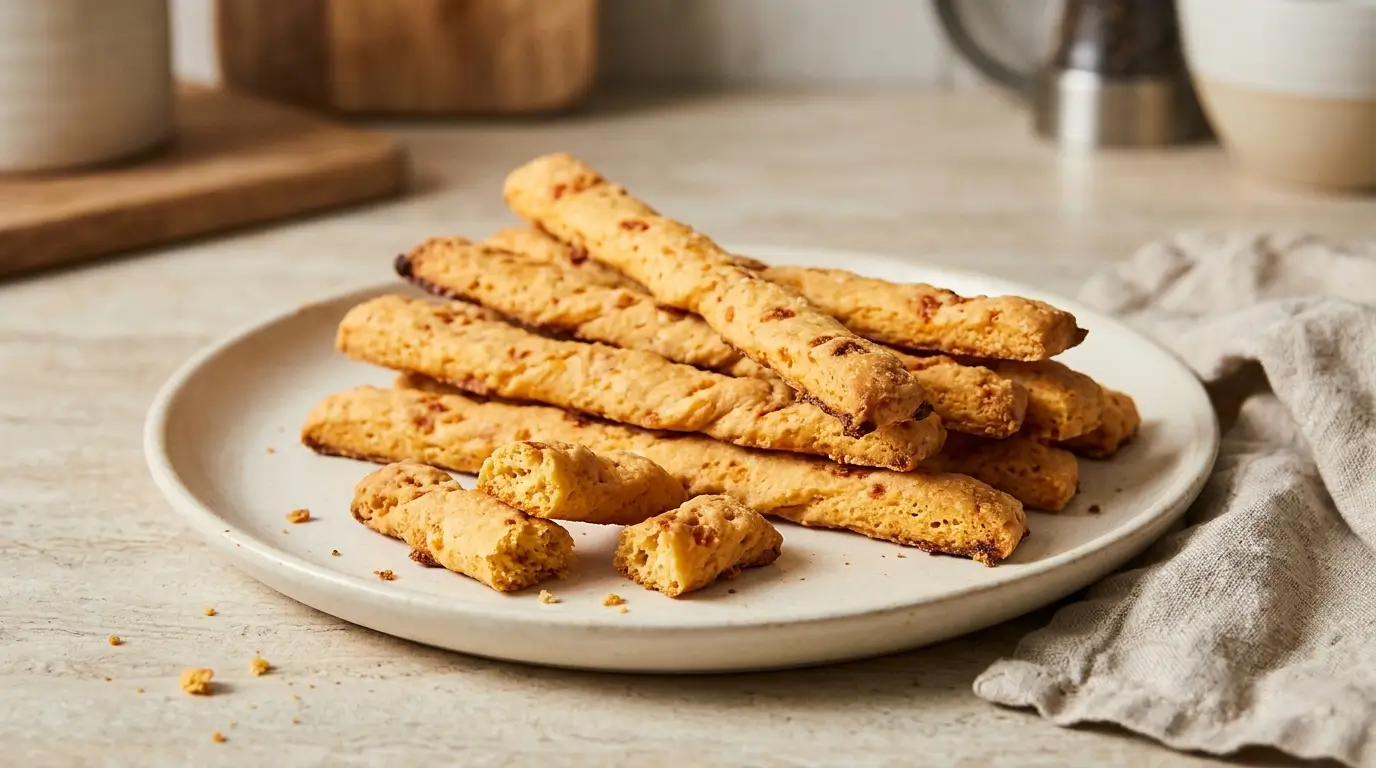
cheese straws recipe
Ingredients
Method
- Grate the cheddar cheese from a block. Let the butter soften at room temperature. Preheat the oven to 350°F (175°C) and line a baking sheet with parchment paper.
- Beat the softened butter and grated cheddar together until fluffy and well combined.
- Mix the flour, salt, and cayenne pepper in a separate bowl. Add to the cheese mixture and mix until crumbly. Press the dough together until it forms a cohesive dough.
- Shape the dough into a flat rectangle, wrap, and refrigerate for 30 minutes.
- Roll the chilled dough on a lightly floured surface to about ¼ inch thick. Cut into strips approximately ½ inch wide and 3–4 inches long. Transfer to the prepared baking sheet, leaving a little space between the strips.
- Bake for 15–20 minutes, checking from 15 minutes, until the edges are lightly golden.
- Let the cheese straws rest on the baking sheet for 5 minutes, then transfer to a wire rack to cool and crisp.
Notes
Table of Contents
Cheese Straws Recipe Ingredients
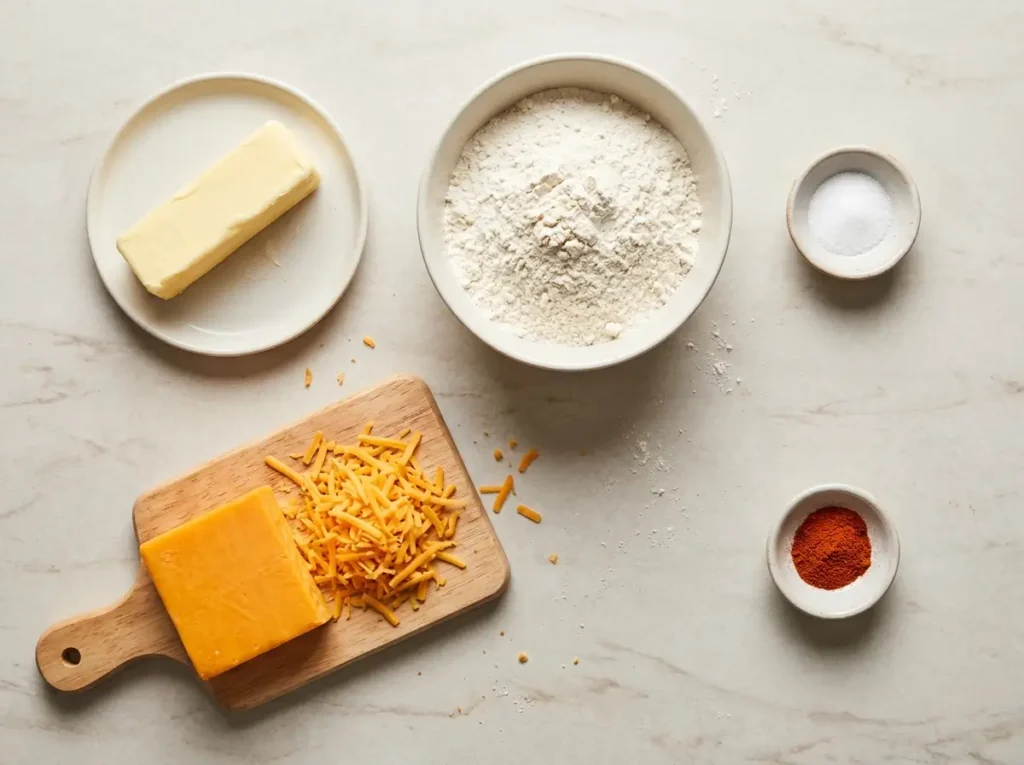
You only need five ingredients, and the flavor comes almost entirely from the cheese, so choose a good one.
- 2 cups (about 8 oz / 225 g) sharp cheddar cheese, freshly grated. Sharp or extra-sharp cheddar gives the deepest, tangiest flavor and a rich orange color.
- 1/2 cup (113 g) unsalted butter, softened. Butter carries the cheese flavor and gives the straws their tender, short texture.
- 1 1/2 cups (190 g) all-purpose flour. This is the structure that turns the dough into crisp, sliceable strips.
- 1/2 teaspoon fine salt. A small amount sharpens the cheese. Adjust slightly if your cheddar is very salty.
- 1/4 teaspoon cayenne pepper. Just enough warmth to make the cheese taste brighter without making the straws spicy.
Substitutions and Swaps
- Cheese: Try aged Gruyère, Colby Jack, or a mix of cheddar and Parmesan for a nuttier bite. Very soft, high-moisture cheeses can make the dough sticky, so stick with firm, aged varieties.
- Spice: Swap the cayenne for smoked paprika, black pepper, or a pinch of garlic powder.
- Butter: Salted butter works if you reduce the added salt.
- Flour: A 1:1 gluten-free baking blend can replace the all-purpose flour (see the healthier alternatives section below).
Equipment: a box grater, a large mixing bowl, a rolling pin, a sharp knife or pizza cutter, a baking sheet, and parchment paper.
Cheese Straws Recipe Timing
- Prep time: 15 minutes
- Chilling time: 30 minutes
- Bake time: 15 to 20 minutes
- Total time: about 1 hour 5 minutes
- Yield: roughly 36 to 40 straws
Most of the clock time is hands-off chilling, so the active work is short. You can mix the dough in the morning and bake just before guests arrive.
How to Make Cheese Straws
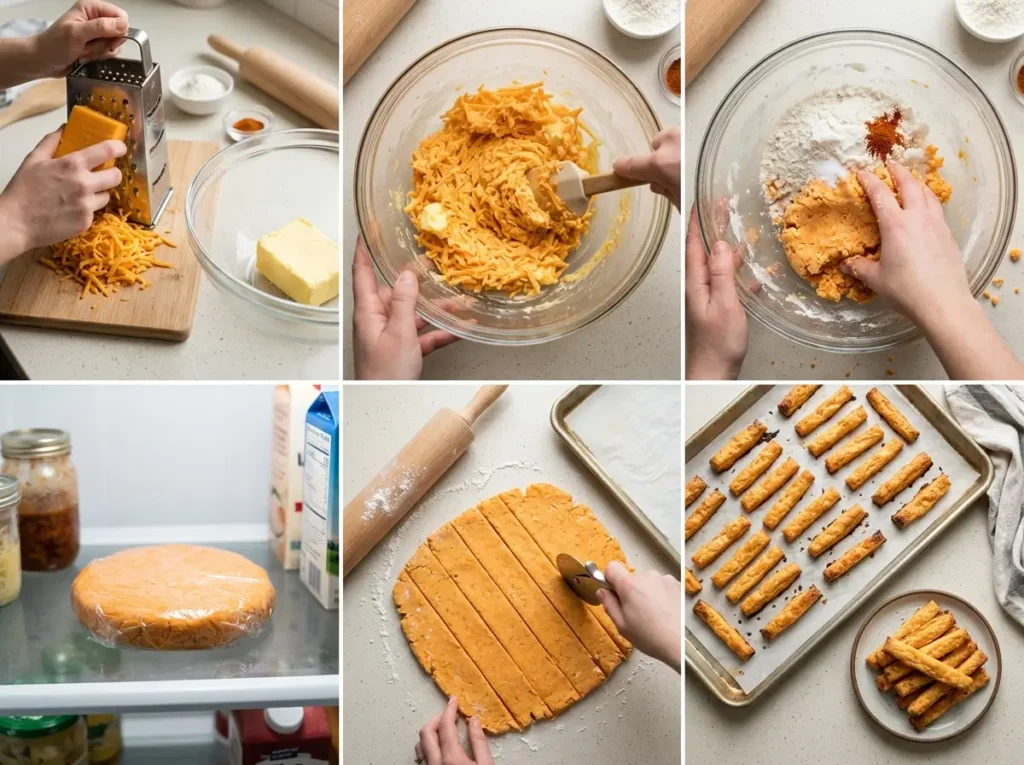
Step 1: Grate the Cheese and Soften the Butter
Grate the cheddar from a block rather than using pre-shredded cheese. Pre-shredded cheese is often coated with anti-caking starch, which can keep the dough from coming together smoothly. Let the butter sit at room temperature until it gives easily when pressed. Preheat your oven to 350°F (175°C) and line a baking sheet with parchment paper.
Step 2: Cream the Butter and Cheese
In a large bowl, beat the softened butter and grated cheese together until the mixture looks fluffy and well combined. A hand mixer makes this quick, but a sturdy spoon works too. The cheese should be evenly distributed with no large clumps.
Step 3: Add the Flour and Seasonings
Whisk the flour, salt, and cayenne together in a small bowl, then add them to the cheese mixture. Mix until the dough looks crumbly, like coarse wet sand. This is normal. Press the crumbs together with your hands until they form a cohesive dough. If it feels truly dry and will not hold together, knead it a few extra times, since the warmth of your hands helps the butter bind everything.
Step 4: Chill the Dough
Shape the dough into a flat rectangle, wrap it, and refrigerate for about 30 minutes. Chilled dough is easier to roll and helps the straws hold their shape in the oven instead of spreading.
Step 5: Roll and Cut the Straws
Lightly flour your work surface and roll the dough to about 1/4 inch (6 mm) thick. Cut it into strips roughly 1/2 inch (1.3 cm) wide and 3 to 4 inches (8 to 10 cm) long. A pizza cutter gives clean, straight edges. Transfer the strips to the lined baking sheet with a little space between them. For a twisted look, gently twist each strip once or twice before placing it down.
Step 6: Bake Until Golden
Bake for 15 to 20 minutes, until the edges are lightly golden and the straws smell toasty and cheesy. Ovens vary, so start checking at 15 minutes. Pull them when the edges are golden rather than deeply brown, because cheese can turn bitter if it over-bakes.
Step 7: Cool for Extra Crunch
Let the straws rest on the baking sheet for about 5 minutes, then move them to a wire rack. They firm up and become noticeably crisper as they cool, so do not judge the texture straight from the oven.
Cheese Straws Nutritional Information
Exact nutrition depends on the brand of cheddar and butter you use and on how many straws you make, so the most accurate approach is to enter your own ingredients into a recipe nutrition calculator and fill in the table below.
| Per serving (3 straws) | Amount |
|---|---|
| Calories | [calculate] |
| Total fat | [calculate] |
| Saturated fat | [calculate] |
| Carbohydrates | [calculate] |
| Protein | [calculate] |
| Sodium | [calculate] |
In general terms, cheese straws are a rich snack made mostly of butter, cheese, and refined flour. That means they provide some protein and calcium from the cheese, but they are also relatively high in saturated fat and sodium. They are best enjoyed in small portions as part of a party spread.
Healthier Cheese Straws Recipe Alternatives
- Part whole wheat: Replace up to half of the all-purpose flour with whole wheat pastry flour for extra fiber and a nuttier taste.
- Gluten-free: Use a 1:1 gluten-free baking blend. The dough may be a little more fragile, so chill it well and handle it gently.
- Bolder cheese, less of it: A strong aged cheddar or a little Parmesan delivers more flavor per bite, so you can feel satisfied with a smaller portion.
- Seed boost: Press sesame, poppy, or pumpkin seeds onto the strips before baking for added texture and nutrients.
- Smaller straws: Cutting them slightly shorter makes portion control easier at a party.
Keep in mind that reduced-fat cheese and less butter will change the texture and may make the straws less crisp, so test a small batch first.
Serving Suggestions for Cheese Straws
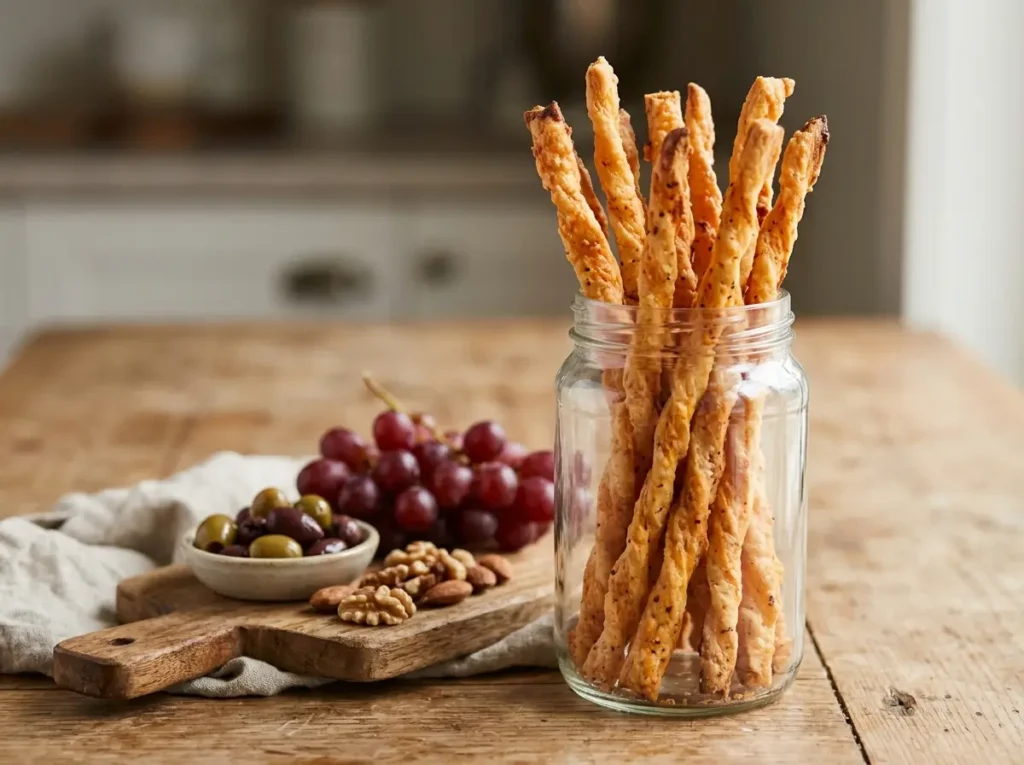
- Party platters: Stand the straws upright in a tall glass or jar for an easy, eye-catching centerpiece.
- With dips: Serve alongside tomato soup, marinara, pimento cheese, or a creamy spinach dip.
- On a snack board: Pair them with olives, grapes, nuts, and cured meats.
- With drinks: They go well with sparkling wine, a crisp white, light beer, or hot tea.
- Soup and salad sidekick: Crumble a few over a green salad or serve them next to a warm bowl of soup for a crunchy contrast.
Common Cheese Straws Mistakes to Avoid
- Using pre-shredded cheese. The coating can keep the dough from binding well and affect the texture. Grate your own.
- Skipping the chill. Warm dough spreads and bakes up greasy. Even 30 minutes in the fridge makes a visible difference.
- Rolling too thin. Very thin strips can burn before the centers dry out. Aim for about 1/4 inch.
- Over-baking. Browned, dark straws taste bitter. Pull them at a light golden color.
- Cutting the butter or cheese too aggressively. Both provide the moisture the dough needs. Reducing them too much can leave you with dry, crumbly dough.
- Judging crispness too early. The straws crisp up as they cool, so wait before deciding they are underdone.
Storing Cheese Straws
- Room temperature: Cool the straws completely, then store them in an airtight container for up to 4 to 5 days. Placing a sheet of parchment between layers helps protect them.
- Make-ahead dough: Wrap the dough tightly and refrigerate for up to 2 days, then let it sit at room temperature for a few minutes before rolling.
- Freezing dough: Freeze the wrapped dough for up to 2 to 3 months and thaw overnight in the fridge.
- Freezing baked straws: Freeze in a sealed container for up to 2 months.
- Re-crisping: If they soften, warm them in a 300°F (150°C) oven for 5 to 8 minutes and let them cool again.
Final Thoughts on This Cheese Straws Recipe
Five simple ingredients, a short chill, and a watchful eye in the oven are all you need for crisp, buttery, cheesy straws. Try this cheese straws recipe for your next gathering, then tell us how it turned out in the review section or the comments. Subscribe to the blog for more easy recipes and baking tips.
Looking for more savory party bites? Explore our Appetizers collection for easy crowd-pleasing snacks, or try our Baked Chicken Pinwheels for another delicious bite to share.
Cheese Straws Recipe FAQs
Can I make this cheese straws recipe ahead of time?
Yes. You can refrigerate the dough for up to 2 days or freeze it for a couple of months. Baked straws also keep well in an airtight container for several days.
Why are my cheese straws soft instead of crispy?
The usual causes are under-baking, rolling the dough too thick, or storing the straws before they have cooled completely. Bake until the edges are golden, let them cool on a wire rack, and keep them in an airtight container.
Why did my cheese straws spread or turn greasy?
The dough was probably too warm. Chilling the dough before rolling and cutting helps the butter stay solid until the structure sets in the oven.
What is the best cheese for cheese straws?
Sharp or extra-sharp cheddar is the classic choice. Aged Gruyère, Colby Jack, or a little Parmesan mixed in also work well. Choose firm, aged cheeses rather than soft, high-moisture ones.
Can I use pre-shredded cheese?
You can, but freshly grated cheese from a block usually blends more smoothly into the dough because it lacks the anti-caking coating found on many bagged shreds.
Can I make cheese straws without a rolling pin?
Yes. Press the dough into a flat rectangle on the parchment with your hands, or use a cookie press fitted with a ribbon disc if you have one.
How do I make cheese straws spicier or milder?
Adjust the cayenne. Use a pinch for a mild kick, more for extra heat, or replace it with smoked paprika for a gentler, smoky flavor.
Can I make this cheese straws recipe gluten-free?
Yes, with a 1:1 gluten-free baking blend. Chill the dough well and handle it gently, as it can be more delicate to roll.
Bake It. Love It. Tell Us About It.
There are no reviews yet. Be the first one to write one.