
Sourdough Cheese Bread: The Ultimate Delicious Guide
Imagine a deliciously tangy and richly flavorful loaf that combines the complexity of sourdough with the creamy goodness of cheese. This is what sourdough cheese bread offers—a perfect blend of artisanal baking and indulgence. Whether you’re crafting a sandwich, serving it as an appetizer, or enjoying it as a side dish, this bake is incredibly versatile.
One of the standout features of this recipe is its health benefits. The fermentation process not only enhances flavor but also improves digestibility and nutrient absorption. This makes it a favorite among health-conscious bakers. Plus, it’s easier to make at home than you might think, with proper guidance and a bit of patience.
Since 2020, sourdough has seen a surge in popularity, with more people experimenting with home baking. This recipe stands out from traditional loaves by incorporating cheese, adding a unique twist to a classic favorite. Ready to dive into the world of sourdough cheese bread? Let’s get started!
Table of Contents
Introduction to Sourdough Cheese Bread
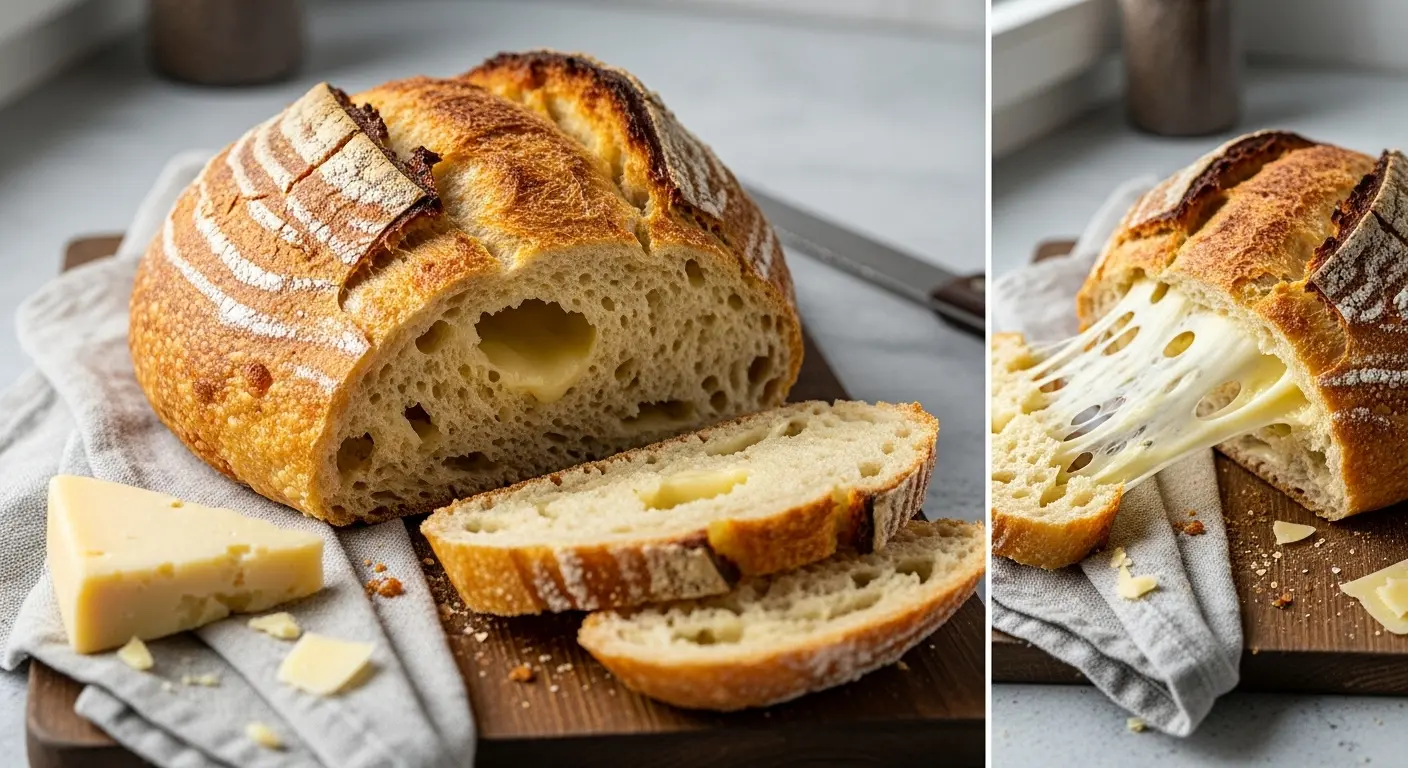
A golden crust and soft interior make this bake a crowd-pleaser. The combination of tangy fermentation and melty cheese creates a unique flavor and texture that’s hard to resist. This recipe is a modern twist on traditional baking, blending artisanal techniques with indulgent ingredients.
The history of sourdough dates back centuries, with its roots in ancient fermentation practices. Adding cheese to the mix is a more recent innovation, elevating the classic loaf to new heights. The lactic acid from the starter balances perfectly with the savory notes of cheese, creating a harmonious flavor profile.
When it comes to texture, you can choose between a crusty artisan loaf or a softer sandwich-style variation. The former is perfect for dipping into soups, while the latter works great for sandwiches. Both options offer a satisfying bite and a rich, cheesy aroma.
Nutritionally, this bake has an edge over commercial options. The fermentation process enhances digestibility and boosts protein content. Common cheese pairings like cheddar, parmesan, and gruyere add depth and richness to the loaf.
Versatility is another key feature. You can enjoy it for breakfast, lunch, or dinner. Whether baked as a free-form boule or in a loaf pan, this recipe adapts to your preferences. It’s a delicious way to explore the art of baking at home.
What You Need to Make Sourdough Cheese Bread
To create a standout loaf, you’ll need the right mix of ingredients and tools. Whether you’re a beginner or an experienced baker, having the essentials on hand ensures a smooth process and delicious results.
Essential Ingredients
Start with bread flour, which has a higher protein content than all-purpose flour. This helps develop gluten for a chewy texture. You’ll also need filtered water, as its temperature affects fermentation. Aim for lukewarm water to activate the starter effectively.
Salt is crucial for flavor and gluten development. Use fine sea salt for even distribution. Finally, choose your cheese wisely. Opt for blocks instead of pre-shredded varieties to avoid anti-caking agents. Cheddar, parmesan, or gruyere work beautifully.
Tools and Equipment
A stand mixer is recommended for kneading, as it ensures proper gluten development. If you prefer hand kneading, a sturdy bowl and bench scraper are essential for handling the dough. For baking, decide between a Dutch oven or a loaf pan. The former creates a crusty exterior, while the latter yields a softer texture.
Other handy tools include a banneton for shaping or a floured kitchen towel as an alternative. A digital scale ensures precise measurements, which is key to consistent results.
Preparing Your Sourdough Starter
A well-prepared starter is the foundation of a great bake. To ensure it’s ready, feed it 4-12 hours before use. Look for signs like a bubbly surface and doubled size, indicating peak activity.
Use a 1:1:1 ratio of flour, water, and starter fed for consistent results. This balance ensures proper hydration and fermentation. Visual cues like a dome shape and honeycomb bubbles confirm it’s active.
Temperature plays a key role. At room temperature, activation speeds up, while cooler environments slow it down. Adjust feeding schedules based on your climate.
If your starter has been neglected, revive it with daily feedings. Discard half and add fresh flour and water. Within a few days, it should regain its strength.
- Hydration percentage: Adjust based on your flour type for optimal consistency.
- Smell indicators: A sweet aroma means it’s ready, while an acidic scent suggests over-fermentation.
- Maintenance: Store it in the fridge between bakes and feed weekly to keep it healthy.
With these tips, your sourdough starter will be ready to create delicious results every time.
Mixing the Dough
The process of mixing dough is where the magic begins. This step sets the foundation for texture, flavor, and structure. Whether you’re a beginner or a seasoned baker, mastering this stage ensures a successful bake.
Combining Ingredients
Start by combining flour and water in a large bowl. This initial step, known as the autolyse technique, allows the flour to hydrate and gluten to form naturally. Let the mixture rest for about 30 minutes before adding salt.
You can mix by hand or use a stand mixer. Hand mixing gives you better control over the dough’s consistency, while a mixer saves time and effort. Keep the temperature consistent, as it affects fermentation.
After adding salt, perform the windowpane test to check gluten development. Stretch a small piece of dough; if it forms a thin, translucent membrane, it’s ready.

Incorporating Cheese
Adding cheese to the dough requires a careful approach. Use room-temperature cheese to prevent fat from interfering with the gluten matrix. Layer or knead it in during the stretch-and-fold process for even distribution.
Here are some tips to ensure success:
- Layer vs. knead: Layering creates pockets of cheese, while kneading distributes it evenly.
- Cold vs. room temp: Room-temperature cheese blends better without affecting dough structure.
- Stretch and folds: Incorporate cheese during this stage to maintain dough integrity.
With these techniques, your dough will have a perfect balance of flavor and texture.
Bulk Fermentation and Stretch and Folds
The next step in crafting your loaf involves patience and precision. Bulk fermentation is where the dough develops its flavor and structure. This process typically takes 4-6 hours, depending on ambient temperature and dough hydration.
Understanding Bulk Fermentation
During bulk fermentation, the dough rests in a bowl at room temperature. Aim for an environment between 68-75°F for optimal results. Keep an eye on the dough’s volume—it should increase by about 50% during this time.
Cheese can slightly impact fermentation timing. Its fat content may slow down the process, so monitor the dough closely. Look for visual cues like a puffy surface and small bubbles forming beneath it.
Performing Stretch and Folds
The stretch and fold technique strengthens the dough without heavy kneading. Over 2 hours, perform 4-6 sets of folds, rotating the dough clockwise each time. Use a wet hand to handle high-hydration dough easily.
Here’s how to do it effectively:
- Gently stretch one side of the dough upward and fold it over itself.
- Rotate the bowl 90 degrees and repeat the process.
- Monitor dough strength—it should feel elastic and hold its shape.
Integrate cheese during the folds for even distribution. This ensures every bite is packed with flavor. By the end of this stage, your dough will be ready for shaping.
Shaping Your Sourdough Cheese Bread
Shaping your dough is a critical step in achieving the perfect loaf. It ensures even baking, a beautiful crust, and a well-structured interior. Start by pre-shaping the dough with a bench knife to create initial tension. Let it rest for 30 minutes on the counter—this is called the bench rest—before final shaping.
- Create tension: Use gentle folds and tucks to build surface tension, which helps with oven spring.
- Choose your shape: A boule (round) or batard (oval) are popular options, depending on your preference.
- Handle with care: Avoid over-handling to preserve the dough’s structure and prevent cheese leakage.
- Prepare your pan: If using a loaf pan, lightly grease or line it to prevent sticking.
- Flour alternatives: For sticky dough, use rice flour or semolina for dusting instead of regular flour.
After shaping, let the dough rest briefly before transferring it to the baking vessel. Proper shaping ensures your loaf bakes evenly and looks professional. With practice, you’ll develop a feel for the right tension and technique.
Cold Fermentation
Cold fermentation is a game-changer for enhancing flavor. By placing your dough in the fridge for 14-20 hours, you allow the yeast to work slowly, developing a richer and more complex taste. This process, also known as retarding, is essential for achieving depth in your bake.
Choosing the right container is crucial. An airtight container prevents the dough from drying out, while a breathable one allows for slight airflow. Both options work well, so pick what suits your setup best. If you need to pause the proofing process, the fridge acts as a reliable emergency stop.
When transitioning from the fridge to the oven, let the dough rest at room temperature for about 30 minutes. This helps it adjust to the warmer environment, ensuring even baking. Be mindful of the maximum time for cold fermentation—exceeding 24 hours can lead to over-proofing.
Here are some key benefits of the retarding process:
- Flavor complexity: Slow fermentation unlocks deeper, more nuanced tastes.
- Flexibility: You can adjust your baking schedule to fit your routine.
- Texture improvement: The dough develops a better structure and crumb.
Mastering cold fermentation takes practice, but the results are worth the effort. With patience and attention to detail, you’ll elevate your bake to new heights.
Baking Your Sourdough Cheese Bread
The final step in crafting your masterpiece is baking it to perfection. This stage transforms your dough into a golden, flavorful loaf with a crisp crust and tender interior. Proper preparation and attention to detail ensure consistent results every time.
Preheating the Oven
Start by preheating your oven to 500°F if using a Dutch oven. The thermal mass of the Dutch oven helps create a steamy environment, which is essential for a good rise and crust. For loaf pans, preheat to 392°F.
If you don’t have a Dutch oven, consider using a baking stone or steel as an alternative. These materials retain heat well and mimic the effects of a Dutch oven. Always use an oven thermometer to ensure accurate temperature readings.

Scoring and Baking
Before baking, score the dough with a lame or sharp knife. Hold the blade at a 30-degree angle for optimal expansion. This step allows the dough to rise evenly and prevents irregular cracking.
If you’re not using a Dutch oven, create steam by placing a pan of water on the lower rack of the oven. This mimics the steamy environment needed for a good rise. Bake the loaf for 25 minutes with the lid on, then reduce the temperature to 450°F and bake uncovered for another 20 minutes.
For loaf pans, bake for 40 minutes at 392°F. Check the internal temperature with a thermometer—it should read 210°F when done. Let the loaf cool completely before slicing to preserve its texture.
Tips for the Perfect Sourdough Cheese Bread
Mastering the art of creating the perfect loaf requires attention to detail and a few expert tips. Whether you’re troubleshooting cheese distribution or verifying starter vitality, these strategies will help you achieve consistent results.
To avoid uneven cheese pockets, layer it during the stretch-and-fold process. This ensures even distribution without disrupting the dough’s structure. If your starter seems sluggish, perform a float test to check its vitality. A healthy starter should float in water.
Control dough temperature by keeping it in a cool environment. Cold dough is easier to score and helps avoid over-fermentation. If your dough feels too warm, refrigerate it for 30 minutes before shaping.
For storage, keep your loaf on the counter for up to 24 hours. For longer preservation, wrap it tightly and freeze for up to 2 months. When reheating, use an oven or toaster to restore its crisp crust and soft interior.
Finally, make sure your ingredients are fresh and high-quality. The right flour and cheese can make all the difference. With these tips, you’ll elevate your baking game and enjoy delicious results every time.
Conclusion
Now that you’ve explored the steps to create this flavorful bake, it’s time to enjoy the results. This recipe combines patience, technique, and creativity to deliver a satisfying experience. Whether you’re a first-time baker or a seasoned pro, the process is worth the effort.
For added variety, try experimenting with herb blends or smoked cheeses. These tweaks can elevate the flavor and make each bake unique. Share your creations with the community using #sourdoughbaking to inspire others.
Pair your loaf with soups or salads for a complete meal. Proper storage and ongoing maintenance of your starter ensure consistent results for future bakes. With this information, you’re ready to master the art of baking at home.
Remember, every bake is a learning opportunity. Keep refining your skills, and soon you’ll enjoy delicious results every time. Happy baking!
FAQ
Can I substitute another flour in this sourdough cheese bread recipe?
You can use flours like whole wheat or rye to change the flavor, but bread flour is recommended for the best chewy texture and strong dough structure.
How can I tell when my sourdough starter is active and ready?
A ready starter should be bubbly, double in size after feeding, and have a mild tangy aroma. It’s ready to bake with if a small spoonful floats in water.
Can I use cheeses other than cheddar in the dough?
Yes! Cheddar is a great option, but cheeses such as Gouda, Parmesan, or blue cheese also work well and add unique flavor variations.
Why does this recipe use cold fermentation?
Cold fermentation slows yeast activity, allowing the dough to develop more complex flavors and improving the overall texture of the bread.
What’s the best way to store leftover sourdough cheese bread?
Keep the bread in an airtight container at room temperature for up to three days. For longer storage, slice the loaf and freeze it in a tightly sealed freezer bag.
What’s the best method for reheating sourdough cheese bread?
Preheat the oven to 350°F, wrap the loaf in foil, and warm it for about 10 minutes to restore a crisp crust and soft interior.
Is the stretch and fold step really necessary?
Although optional, stretch and folds help strengthen gluten, leading to better rise, structure, and texture in the finished loaf.
How can I keep the cheese from burning while baking?
Bake the loaf on the middle rack and monitor it closely. If the crust browns too fast, loosely tent it with foil to prevent over-browning.
Bake It. Love It. Tell Us About It.
There are no reviews yet. Be the first one to write one.