
Easy Cheddar Jalapeño Sourdough Bread (Dutch Oven Recipe)
This Cheddar Jalapeño Sourdough Bread is an easy homemade recipe with a crispy crust, soft crumb, and bold cheesy heat. Baked in a Dutch oven using simple ingredients, this loaf is approachable for beginners yet satisfying for experienced sourdough bakers.
There’s something special about pulling a freshly baked loaf from the oven—the crackle of the crust, the warmth in your hands, and the aroma that fills your kitchen. This recipe is designed to help you enjoy that moment with confidence, guiding you through each step without overcomplicating the process.
With the perfect balance of tangy sourdough, sharp cheddar, and just enough jalapeño heat, this loaf is flavorful without being overwhelming. The dough is allowed to rest and ferment slowly, building depth of flavor and a beautiful texture naturally. Whether you’re baking for everyday meals or sharing with friends, this is a recipe you’ll come back to again and again.
Table of Contents
Introduction to Cheddar Jalapeño Sourdough Bread
Baking homemade sourdough bread connects you to a tradition older than written history. With just four ingredients—flour, water, salt, and starter—you create something alive, evolving with every fold and rise. This recipe strips away complexity, focusing on techniques that reward both new bakers and seasoned pros.
Why Homemade Cheddar Jalapeño Sourdough Is Worth the Time
Quality bread flour gives structure, while an active starter adds natural lift and tang. Unlike commercial yeast, wild cultures in your starter develop flavors over hours, not minutes. Letting dough rest during bulk fermentation unlocks subtle sour notes and airy pockets.
Why this recipe stands out for beginners and enthusiasts
Clear timetables remove guesswork when baking cheddar jalapeño bread at home. You’ll learn when to let dough relax between folds and how temperature affects rise. For added depth, fold shredded cheddar cheese into layers during shaping—its richness balances the loaf’s acidity perfectly.
The bulk fermentation stage does most of the work, making this method forgiving. Let dough rest overnight, and you’ll wake to a bubbly, ready-to-shape mass. Whether you follow steps exactly or experiment, each bake becomes a lesson in patience and creativity.
Ingredients & Tools for Homemade Sourdough Bread
Every great loaf begins with two fundamentals: quality ingredients and the right tools. Choosing the correct flour type and measuring it precisely determines whether your bread turns out dense or delightfully airy. Let’s break down what truly matters in your kitchen setup.
Best Flour Choices for Artisan Sourdough Bread
Bread flour has higher protein content (12-14%), creating a strong gluten network for chewy crumb structure. Whole wheat flour adds nutty flavor but requires blending with white flour to avoid heaviness. For lighter results, let dough rest 30 minutes after mixing—this autolyse period hydrates flour fully.
Always use a digital scale. Cups vary wildly: 120g of flour per cup versus 150g can ruin hydration ratios. Precision ensures consistent fermentation and rise.
Essential Tools for Baking Homemade Sourdough Bread
These items streamline the process:
- Bench scraper: Shapes dough cleanly without sticking
- Banneton basket: Supports dough during final proof
- Dutch oven: Traps steam for crackling crust
- Thermometer: Monitors water temperature (75-80°F ideal)
Remember: letting dough rest between folds isn’t optional. Those 15-20 minute pauses let gluten relax, making shaping easier. With these ingredients and tools, you’re equipped to handle any recipe confidently.
Preparing Your Sourdough Starter and Pre-Fermentation
A lively starter is the heartbeat of every great loaf. Whether you’re baking a classic boule or experimenting with add-ins, this living culture needs regular care. Timing and temperature work together to transform simple ingredients into a bubbly, active mixture ready for action.
How to Feed and Activate a Healthy Sourdough Starter
Begin at 8 AM: discard half your starter, then add 50g each of flour and warm water (75°F) to your bowl. Mix until smooth, scraping the sides to keep everything incorporated. By 9 AM, tiny bubbles should appear—this signals fermentation has started.
Repeat every 12 hours if your kitchen stays below 70°F. Warmer spaces? Stick to 6-hour intervals. A digital thermometer helps track water temperature, ensuring consistency. Your starter doubles in size when ready—usually within 4-6 hours after feeding.
Tips for Maintaining the Perfect Temperature
Keep your bowl in a spot with steady warmth. Place it near the oven while preheating, or use a seedling mat set to 78°F. For cooler homes, fill a large container with warm water and float the starter jar inside—swap water every 30 minutes to retain heat.
Pre-fermentation begins after feeding. Let the mixture rest 30 minutes before mixing dough. This autolyse phase hydrates flour fully, creating stretchier gluten and deeper flavor. Consistent routines turn unpredictable starters into reliable partners.
Autolyse & Dough Mixing for Artisan Sourdough Bread
The autolyse method might seem simple, but it’s where great bread begins. By mixing flour and water first, you kickstart gluten development without interference. This resting period allows proteins to bond naturally, creating a flexible dough that’s easier to shape later.

Mixing Dough for Proper Hydration and Structure
Start with a 75% hydration ratio: 500g flour to 375g warm water. Mix until no dry patches remain. Let the dough rest 30-60 hours—this autolyse phase hydrates the flour fully, reducing kneading time later.
Add your active starter after autolyse. Fold it in gently using wet hands to prevent sticking. The dough should feel stretchy but hold its shape. If it tears easily, let it rest 10 more hours before continuing.
When and How to Add Salt for Flavor Development
Introduce salt 20 hours after mixing. Delaying salt preserves yeast activity early on. Sprinkle 10g evenly over the dough’s surface, then fold repeatedly to distribute. This timing balances the recipe’s tanginess with savory depth.
Salt tightens gluten structure, so avoid adding it too soon. For spicy variations, pair it with ingredients like jalapeños during shaping. The result? A loaf with complex flavor and airy crumb—no dense spots in sight.
Bulk Fermentation & Stretch and Fold Method
The bulk fermentation phase transforms your dough into a living, breathing entity. This is where flavors deepen and textures evolve through natural yeast activity. By managing time and technique, you’ll guide the dough toward its full potential without rushing the process.
Building Gluten Strength in Artisan Sourdough Bread
Stretch and fold replaces traditional kneading. Every 30 minutes for 2-3 hours, wet your hands and pull the dough upward. Fold it over itself, rotating the bowl each time to work all sides. This method:
- Strengthens gluten strands for better structure
- Traps air pockets without deflating the dough
- Distributes ingredients evenly
Stop when the dough resists stretching—this signals developed elasticity. Let it rest undisturbed for the remaining fermentation time.
Monitoring the dough’s progress during fermentation
Watch for these signs your dough is ready:
- Surface appears bubbly and slightly domed
- Dough jiggles when shaken gently
- Finger poke leaves an indent that slowly fills back
Room temperature affects speed. At 75°F, fermentation takes 4-6 hours. Cooler kitchens? Extend time by 1-2 hours. Always track volume—your loaf should nearly double before shaping.
Handle dough from all sides during folds to maintain tension. This ensures even gas distribution and a consistent crumb. Patience here pays off in oven spring and flavor complexity.
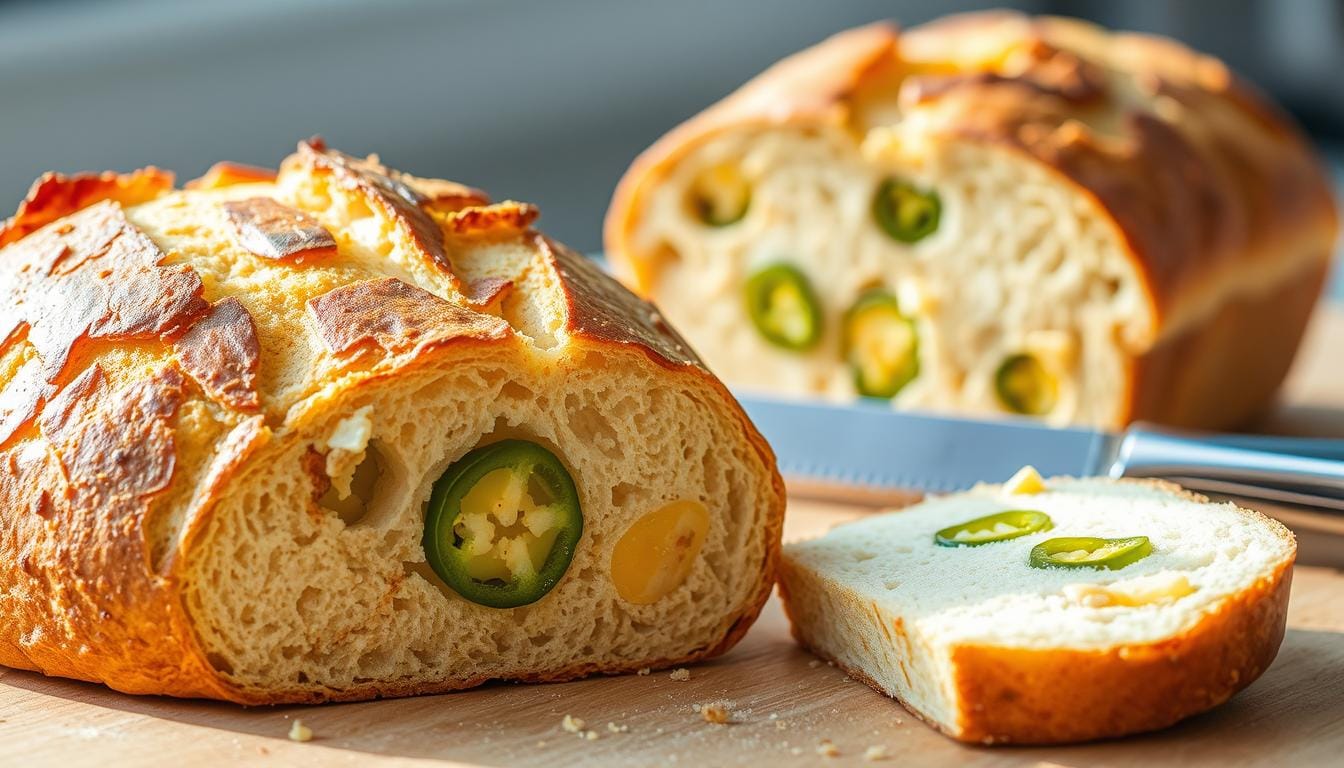
How to Add Cheddar and Jalapeños to Sourdough
The moment you fold bold flavors into your dough marks a turning point for this sourdough cheese bread. Timing and technique ensure every bite bursts with balanced heat and richness. Add ingredients during the second set of stretch and folds—this distributes them evenly without disrupting fermentation.
Adding Cheese Without Ruining Sourdough Texture
Use finely shredded cheese to prevent dense pockets in your cheddar jalapeño sourdough. Toss it in a pinch of flour before folding—this absorbs excess water and stops clumping. Work quickly during bulk fermentation to maintain dough temperature.
Follow these steps for perfect integration:
- Spread dough into a rectangle after the first fold
- Sprinkle cheese evenly across the surface
- Fold edges toward the center, rotating twice
Integrating Peppers Seamlessly
Drain pickled peppers thoroughly—excess moisture weakens gluten structure. For fresh ones, remove seeds and pat dry. Adjust salt slightly if using brined varieties.
- Chop peppers into pea-sized pieces
- Mix with cheese during folding for even heat distribution
- Monitor dough hydration—add 1 tsp water if too stiff
Let the dough rest 10 minutes after final folds. This relaxes gluten around inclusions, ensuring a light crumb. Your loaf will bake with molten cheese pockets and subtle spice in every slice.
Shaping & Proofing Cheddar Jalapeño Bread
The final steps before baking transform your dough from a shapeless mass into a masterpiece. Proper shaping creates surface tension, ensuring an even rise and crust. Your hands and a few simple tools become instruments of precision here.
Techniques for shaping your loaves effectively
Start by dusting your work surface with rice flour. Gently turn the dough out, using a towel-lined bowl to prevent sticking. Follow these steps:
- Fold edges toward the center, rotating clockwise
- Cup your hands around the dough, dragging it to tighten
- Let rest 10 minutes before final shaping
This method builds structure while keeping air pockets intact. For batards, elongate the dough after initial folds. A well-floured towel in your proofing basket supports the shape during the final rise.
Choosing between room temperature and cold fermentation
Your schedule dictates which method works best. Room-temperature proofing (2-4 hours) suits same-day baking. Cold fermentation (12-48 hours in the fridge) slows yeast activity, deepening flavor complexity.
Key considerations:
- Temperature stability: Fridges prevent over-proofing
- Crumb texture: Cooler environments create smaller, even holes
- Convenience: Cold dough handles easier during scoring
Monitor dough growth rather than strict timers. A 30% size increase signals readiness for baking. Adjust your schedule based on kitchen conditions—warm spaces may need shorter proof times.
Baking Jalapeño Cheddar Sourdough in a Dutch Oven
The final moments before your loaf hits the oven determine its character—crisp crust, airy crumb, and bold flavor hinges on two key steps. Mastering your Dutch oven’s heat and strategic scoring transforms good dough into bakery-quality artisan sourdough bread. This stage rewards precision but remains accessible through simple, repeatable methods.

How to Get a Crispy Crust on Sourdough Bread
Place your Dutch oven in the oven 45 minutes before baking. Set the temperature to 500°F—this creates a thermal mass that mimics professional steam-injected ovens. Let the empty pot heat fully; rushing this step leads to uneven browning.
When ready, transfer your dough from the bench to parchment paper. Use wet hands to minimize sticking. Lower the dough into the scorching pot carefully—the parchment acts as a sling. Immediately cover to trap steam, which develops that iconic crackle.
Scoring patterns to release steam
Sharp blades make clean cuts. Hold the tool at a 30-degree angle and slice ¼-inch deep. Popular patterns include:
- Single slash: Simple, effective for round loaves
- Crosshatch: Allows maximum expansion
- Leaf design: Decorative yet functional
Scoring directs where steam escapes, preventing random bursting. Let the dough rest 5 minutes after scoring—this relaxes gluten for better oven spring. Adjust patterns based on inclusions; denser additions like cheese need deeper cuts.
Lower the oven to 450°F after 20 minutes. Remove the lid to finish browning. Your jalapeno cheddar sourdough will sing with flavor when the crust reaches a deep amber hue—usually 25-30 minutes total.
Conclusion: Final Thoughts on Cheddar Jalapeño Sourdough Bread
Your journey from starter to oven proves how simple ingredients become extraordinary in this Cheddar Jalapeño Sourdough through care and technique. By mastering stretch folds and respecting fermentation rhythms, you’ve transformed flour and water into a loaf with crackling crust and tender crumb.
Remember: handling whole wheat blends gently preserves their earthy notes, while consistent feedings keep your sourdough starter lively. Those patient pauses during bulk fermentation let flavors bloom naturally—a lesson in trusting the process.
Now that you’ve nailed the basics, make this jalapeño cheddar sourdough recipe yours. Swap mix-ins seasonally or adjust hydration for different textures. Share your creations proudly—each slice tells a story of folded layers and golden-brown triumph.
Keep your tools clean, your top dough taut during shaping, and your oven blazing hot. With every bake, you’ll refine instincts that turn simple dough into edible art. The real reward? That first bite of warmth you crafted entirely by hand.
FAQ
How long should I let the dough bulk ferment?
Bulk fermentation typically takes 4–6 hours at 75–78°F (24–26°C). Fermentation happens faster in warm conditions and slower in cooler ones. Look for a 30–50% rise and bubbles forming on the surface.
What type of cheese is best for cheddar jalapeño bread?
Sharp or extra-sharp cheddar is the best choice because it retains its flavor through the fermentation and baking process. Avoid cheeses that are too oily, as they can impact the structure of your homemade sourdough bread.
Can I use fresh or pickled jalapeños in sourdough bread?
Both options work. Fresh jalapeños offer a crisp, spicy flavor, while pickled jalapeños bring a tangy and deeper taste. To avoid adding too much moisture, be sure to drain and pat dry the jalapeños before using them in your sourdough cheese bread.
Can I make jalapeño cheddar sourdough without a Dutch oven?
Yes, you can. Use a baking stone or steel and add steam by placing a pan of hot water in the oven. While the crust might not be as crisp, the flavor will still be excellent.
How long does cheddar jalapeño sourdough stay fresh?
This sourdough cheese bread stays fresh for up to three days at room temperature when wrapped in a towel or a bread bag. For longer storage, you can slice the bread and freeze it for up to two months.
Can I use all-purpose flour instead of bread flour for this recipe?
Yes, you can, but bread flour is preferred for a better structure and chewy texture. If you use all-purpose flour, add one tablespoon of vital wheat gluten per cup to improve the texture of your bread.
My dough isn’t rising—what went wrong?
Check your starter’s activity first. It should double within 4–6 hours after feeding. Underproofing, cold temperatures, or expired flour can also hinder fermentation. Adjust and try again!
Bake It. Love It. Tell Us About It.
There are no reviews yet. Be the first one to write one.